Layered Lighting for a Kitchen You Love
Ambient, task and accent.
 Derek Shaw6 min read
The right lighting changes how a kitchen feels more than new cabinets. We have seen it again and again in homes across Dallas: a family saves for years to replace dated cabinets and countertops, and the finished kitchen still feels flat and a little gloomy at night because it is lit by a single ceiling fixture in the middle of the room. Then we add under-cabinet strips, a few recessed lights and a pair of pendants on dimmers, and suddenly the same room glows. The countertops sparkle, the corners disappear into a soft warmth and dinner feels like an occasion.
We plan it in three layers. Ambient light fills the room. Task light makes the work surfaces bright and shadow-free. Accent light adds depth and personality. Each layer does a different job, and together they make a kitchen that works hard at 7 a.m. and feels relaxed at 9 p.m. Here is how our team at Voltwise Electric thinks through each layer, plus the switches and dimmers that tie it all together.
Layer one: ambient light
Ambient light is the base layer. It is the general glow that lets you walk through the room safely and see faces clearly. In most modern kitchens, ambient light comes from recessed downlights, sometimes called can lights, spaced evenly across the ceiling. Flush-mount fixtures, a statement chandelier or a track system can also do the job.
The biggest mistake we see with recessed lights is placement. Lights installed in a neat grid in the center of the ceiling look tidy on a plan, but they often land behind you when you stand at the counter, so your own body casts a shadow on your cutting board. We usually place ambient lights closer to the perimeter, roughly in line with the front edge of the countertops, so the light falls where people actually stand.
Picking the right color of light
LED fixtures come in different color temperatures, measured in kelvins. Lower numbers look warmer and more golden; higher numbers look cooler and bluer. For most homes, we recommend somewhere around 2700K to 3000K. It feels warm and welcoming, flatters wood and stone and still looks clean on white cabinets. Whatever you choose, keep it consistent across every fixture in the room so the light does not look patchy.
Layer two: task light
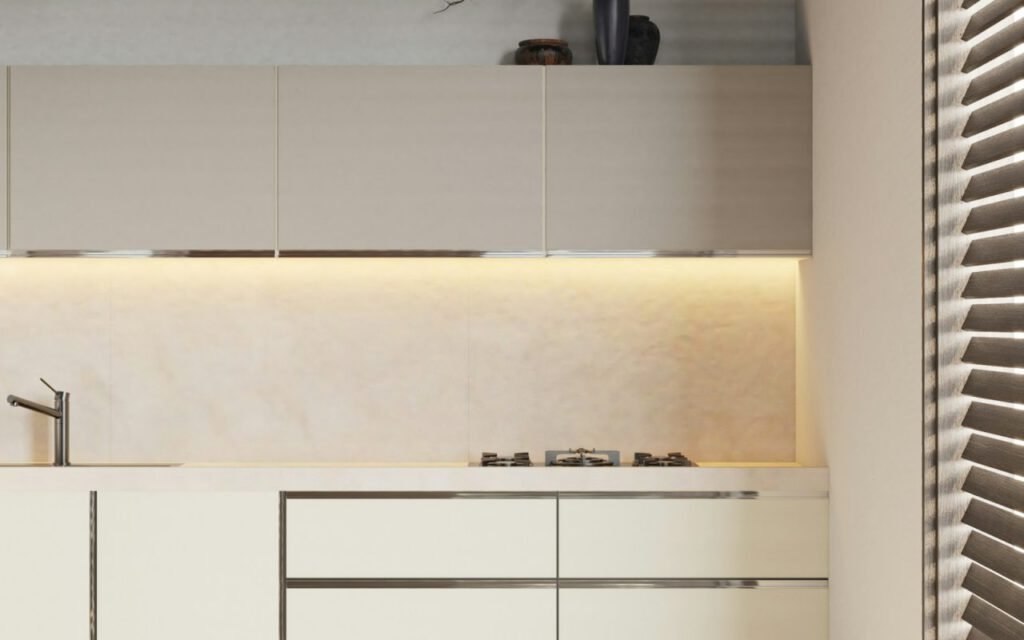
Under-cabinet strips light the counters where you actually work. This is the layer most kitchens are missing, and it is the one that makes the biggest everyday difference. Overhead lights, no matter how bright, always leave the back half of the counter in the shadow of the upper cabinets. Under-cabinet lights fill that space with clean, even light right where you chop, measure and read recipes.
Today’s LED under-cabinet strips are slim, efficient and almost invisible once installed. Here are a few things we keep in mind when planning them:
- Mount the strip toward the front of the cabinet bottom so the light washes the backsplash and the counter evenly.
- Choose a diffused lens to avoid seeing individual LED dots reflected on shiny stone.
- Run the strips continuously, cabinet to cabinet, so there are no dark gaps.
- Plan hardwired power during a remodel to avoid plug-in cords and visible wires.
- Match the color temperature to your ambient lights.
Task lighting also belongs over the sink and the range. A small recessed light or pendant above the sink, and the range hood light over the cooktop, finish the job.
Pendants with purpose
Hang island pendants 30 to 36 inches above the counter, on a dimmer. Pendants over an island or peninsula do double duty. They provide task light for prep and homework, and they act as a decorative focal point that sets the style of the whole kitchen. Choosing them is the fun part, but sizing and spacing matter just as much as looks.
Our pendant planning checklist
- Height: 30 to 36 inches from the countertop to the bottom of the fixture, adjusted for taller family members and ceiling height.
- Number: two pendants for most islands, three for longer ones, or one linear fixture for a modern look.
- Spacing: roughly 24 to 30 inches between pendants, and at least 6 inches in from each end of the island.
- Size: wider pendants for big islands, smaller ones for compact spaces so they do not block sightlines.
- Light quality: open-bottom or glass shades send more light down; solid metal shades focus it.

Put every layer on its own switch. Then dim them all.
Aisha
Layer three: accent light
Accent lighting is the finishing touch. It is not about seeing better; it is about making the room feel layered and alive. Common accent ideas include LED tape inside glass-front cabinets, a soft strip above the upper cabinets that washes the ceiling, toe-kick lights at the base of the cabinets that act as a gentle night light and small picture lights over open shelving or artwork.
Aisha, our lighting design lead, calls accent lighting “the layer that makes people stay in the kitchen after dinner.” A little glow inside the cabinets or along the floor lets you turn the bright lights off and still move around safely, and it makes the room look beautiful from the living room or dining table.
Switches, dimmers and controls
Layered lighting only works if you can control each layer on its own. If every light in the kitchen is on one switch, you lose the whole point. We put ambient, task, pendants and accent lights on separate switches, grouped in a logical bank near the main entry, often with a second switch location at the other doorway.
Dimmers make every layer more useful. Bright for cooking, low for dinner, very low for a late-night glass of water. Make sure your dimmers and LED fixtures are compatible; mismatched products can flicker or buzz. Smart dimmers are another popular option. They let you set scenes, like “cooking,” “dinner” and “night,” and control everything from your phone or a voice assistant.
A sample switch plan
- Switch 1: recessed ambient lights, dimmable.
- Switch 2: under-cabinet task strips, dimmable.
- Switch 3: island pendants, dimmable.
- Switch 4: accent and toe-kick lights.
- Separate switch near the sink for the sink light.
Key takeaway: three layers, separate switches and dimmers everywhere. That simple plan turns a good kitchen into a great one.
Planning your kitchen lighting
The best time to plan lighting is before the drywall goes up, during a remodel, when running new wiring is easiest and least expensive. But even in a finished kitchen, there is a lot we can do. Under-cabinet lights, new pendants on existing boxes, dimmers and smart switches can often be added with minimal disruption, and recessed lights can sometimes be installed from below with small, tidy cuts.
Bring us your cabinet layout, your inspiration photos and a sense of how you use the room. We will suggest fixtures, placement and a switching plan that fits your style and budget. Electrical work in kitchens involves dedicated circuits, code requirements and wet locations, so always use a licensed electrician for any new wiring or fixtures. When it is done right, you will notice the difference every single evening.

Derek Shaw
Derek has wired DFW homes since 2010.






2 Comments
Sharing this with my friends.
Saved this one for later. Really useful.