


 DIY ProjectsBuild Your First Raised Garden BedWood, soil and what to plant first.
Written by
Theo Hart
Theo has painted every room of his 1920s bungalow at least twice.
7Articles
2026Writing since
Wall-mounted shelves are one of the easiest beginner projects. If you have never built anything for your home, this is the place to start. A couple of solid boards, a set of sturdy brackets and a few hours on a Saturday afternoon can give you a handsome bookshelf that holds your favorite reads, a plant or two and the framed photo that has been leaning against the wall since you moved in. You do not need a workshop. You need a drill, a level, a stud finder and the patience to measure carefully. By dinnertime, you will have something useful on the wall and a big boost of confidence for your next project.
Plan your shelf
Start by deciding where the shelf will go and what it will hold. A shelf for paperbacks and small plants can be fairly shallow, around 8 inches deep. Hardcovers, record albums and larger decor need 10 to 12 inches. Measure the wall space and the items you want to display, then sketch a quick plan on paper with dimensions.
Think about height, too. A single shelf above a desk or sofa usually looks best when its bottom edge sits 10 to 18 inches above the furniture. For a stacked arrangement, space shelves about 12 to 15 inches apart for books, or vary the spacing to fit taller items. Use painter’s tape to outline the shelves on the wall and live with the tape for a day before you drill. It is much easier to move tape than holes.
Choosing boards
Solid pine is affordable, easy to cut and takes stain or paint well, making it the classic choice for beginners. Oak, maple and walnut are stronger and more beautiful but cost more. Avoid thin particleboard for books; it can sag over time. A 1-by-10 or 1-by-12 board, which is actually about ¾ inch thick, is a good all-purpose size. For long shelves loaded with books, keep the span between brackets to about 32 inches or less to prevent bowing.
Gather your tools and materials
Here is everything you will need for one or two shelves:
- Wood boards cut to length, about 3 to 4 feet each
- Two to three shelf brackets per board, rated for the weight you plan to hold
- Screws for mounting brackets into studs, usually 2½ to 3 inches long
- Shorter wood screws to attach the board to the brackets
- Heavy-duty wall anchors, only if a bracket cannot land on a stud
- A drill and driver with assorted bits
- A stud finder, a tape measure, a pencil and a 24-inch level
- Sandpaper in medium and fine grit, plus stain, paint or clear finish
- Safety glasses
Many home centers will cut boards to length for you, which saves time and keeps the project saw-free. Most readers spent between $40 and $120 on a single finished shelf, depending on the wood and the style of bracket.

Prep and finish the boards
Do this part first so the finish has time to dry while you prepare the wall. Sand each board with medium-grit paper, working with the grain, then switch to fine grit for a smooth surface. Slightly round over the front edges and corners so they feel soft to the touch.
Wipe away the dust with a damp cloth and let the wood dry. Apply stain, paint or a clear water-based finish following the label directions. Two thin coats look better than one thick one. Water-based finishes usually dry to the touch in about an hour, so you can finish a board in the morning and hang it after lunch. Work in a well-ventilated space and protect the floor with a drop cloth.
Find the studs
Anchor brackets into studs for anything heavy. A shelf full of books can easily weigh 50 pounds or more, and drywall alone is not designed to hold that much. Studs are the vertical wooden or metal framing pieces behind the wall, typically spaced 16 inches apart from center to center in most American homes.
Run a stud finder slowly across the wall and mark the edges of each stud lightly in pencil. To confirm, you can tap a small finishing nail into the wall where it will be hidden behind a bracket; if it hits solid wood, you found it. Plan your bracket positions so as many as possible land on studs. If one bracket falls between studs, use a heavy-duty anchor rated well above the expected load, and follow the manufacturer’s instructions closely.
Check before you drill
Be careful around light switches, outlets and plumbing fixtures, where wires and pipes often run vertically in the wall. If you are unsure what is behind a spot, choose another location or ask a professional. Never drill directly above or below an outlet.
A level is the most important tool you’ll own.
Theo Hart, home editor
Measure twice
Mark level lines before you drill. A shelf that is even slightly crooked will catch your eye every time you walk past, and books will slowly slide toward the low end. A few extra minutes here make the difference between a shelf that looks store-bought and one that looks homemade.
- Mark the height. Measure up from the floor to where the top of the first bracket will sit and make a small mark.
- Draw a level line. Place your level on that mark and draw a light pencil line across the wall, extending over every stud you plan to use.
- Position the brackets. Hold each bracket against the line on a stud and mark its screw holes.
- Drill pilot holes. Use a bit slightly smaller than your screws so the wood does not split.
- Mount the brackets. Drive the screws snugly and check each bracket with the level again.
- Attach the board. Set the shelf on the brackets, center it, and secure it from underneath with short screws.
For a second shelf, measure up from the first one rather than from the floor. Floors are rarely perfectly flat, and measuring from your first level shelf keeps everything parallel.
Style and load it
Once the shelves are up, give them a gentle test by pressing down on the front edge. They should feel solid with no wobble. Then load the heaviest items first, close to the brackets, and lighter pieces toward the middle of each span.
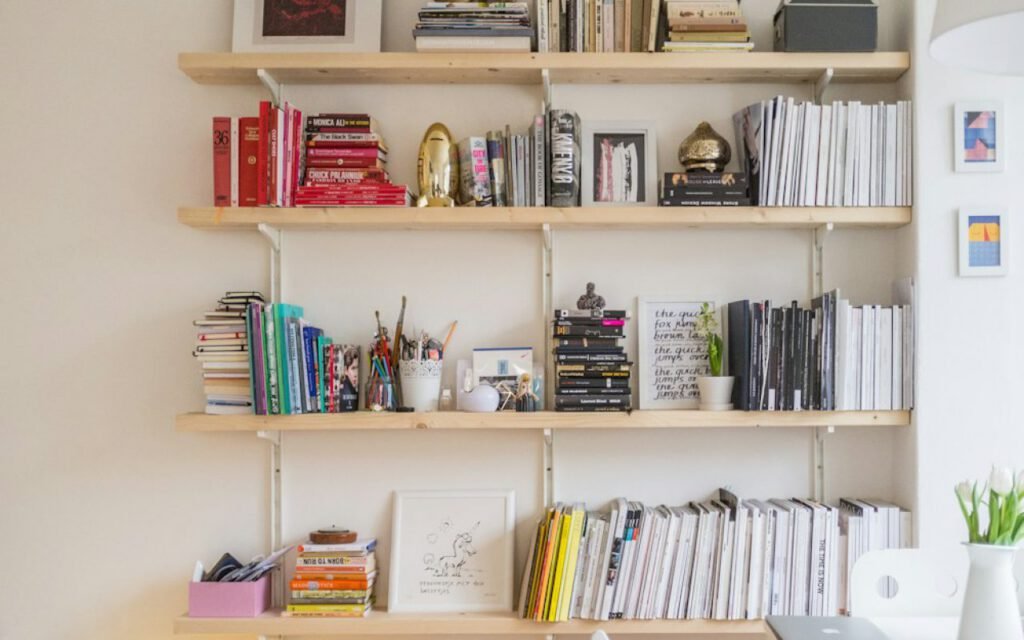
For a pleasing look, mix vertical rows of books with a few horizontal stacks. Add a small plant, a candle, a framed photo or a favorite mug, and leave about a third of each shelf open so it does not look crowded. Grouping books by color is popular, but grouping by topic or by the way you actually read is just as handsome and easier to live with.
If you have young children, consider anchoring any freestanding bookcases nearby to the wall as well, and keep heavy objects off high shelves where they could be pulled down.
Key takeaway: Finish the boards first, anchor brackets into studs, draw a level line before you drill and measure every additional shelf from the first one.
Proud of your wall
There is real satisfaction in setting your favorite book on a shelf you built yourself. This simple project teaches the core skills behind many others: measuring, finding studs, drilling pilot holes and leveling. Once you have done it, a row of floating shelves in the kitchen, a ledge for picture frames or a built-in for the living room no longer seem so intimidating. Start with one board this weekend, take your time, and enjoy the moment you step back, check the bubble one last time and see it sitting perfectly in the middle.
Written by
Theo Hart
Theo has painted every room of his 1920s bungalow at least twice.
7Articles
2026Writing since
Read next
DIY ProjectsBuild Your First Raised Garden BedWood, soil and what to plant first. DecorA Living Room Refresh for Under $500Paint, light and the art of moving furniture.
 DecorHouseplants That Are Nearly Impossible to KillPothos, snake plants and other forgiving friends.
 DecorCreate a Cozy Reading Nook in Any CornerA chair, a lamp and a blanket.
 DIY ProjectsPotting Bench Projects for a WeekendA simple build that organizes everything.
 DecorChoosing Paint Colors Without RegretTest big, test in daylight, test at night.
 DecorSmall Space Living: Making 500 Square Feet Feel BiggerMirrors, multi-use furniture and smart storage.
 DecorPatio Lighting Ideas for Long Summer NightsString lights, lanterns and safe outdoor wiring.
 DIY ProjectsComposting at Home: Easier Than You ThinkGreens, browns and a little patience.
Start the conversation